DIY Thanksgiving Place Setting with Cricut EasyPress
/Affiliate links are included on this page. If you click a link and choose to make a purchase, I will earn a commission. Thank you for supporting my business!
When you're hosting a meal, there's nothing more welcoming than a pretty table.
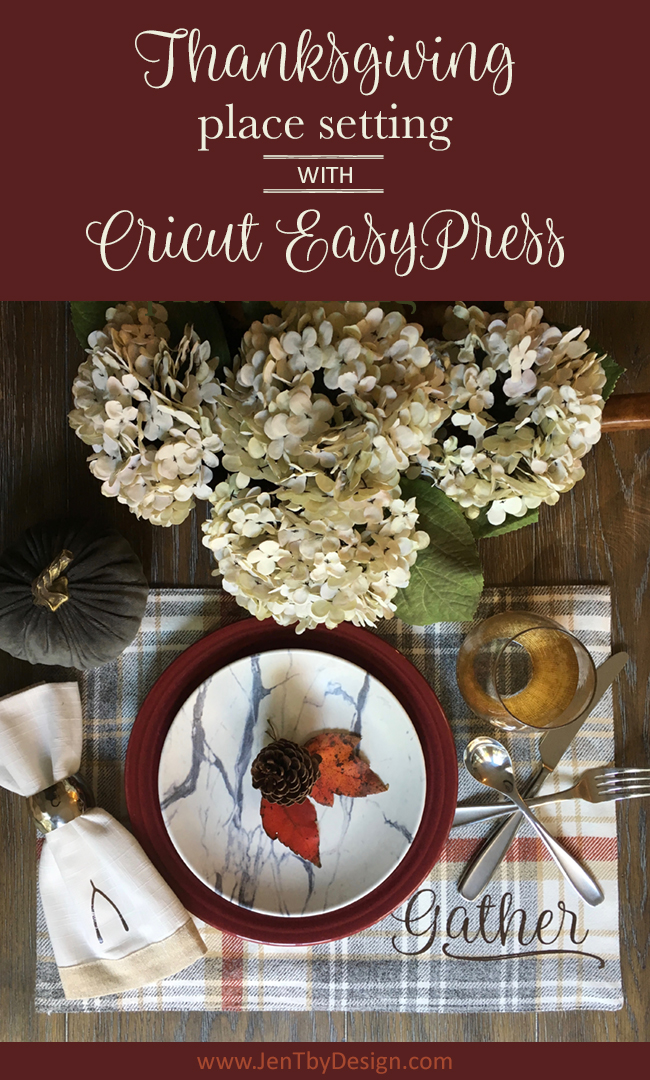
During one of my {far too many} visits to Target, I found these gorgeous flannel place mats and knew they needed to make their way into my cart!
I already had some pretty linen napkins that matched perfectly, and quickly decided that a DIY Thanksgiving Place Setting was gonna have to go down!
I had some iron-on foil in a stunning pewter color tucked away in my stash, and it looked sooooo good against the Autumn colors in the placemat!
I pulled out my Cricut Maker {if you don't have one, you should totally be asking Santa for one}, and quickly whipped up some text for the placemat in Cricut Design Space, and I also made a little wishbone to go on the napkin.
Here's what's cool...you can do whatever you want here! Names, initials, sayings...whatever floats your boat. The possibilities are endless! There are lots of great ideas in Cricut Access, too, if you're looking for inspiration.
If you like the text and wishbone that I used, I'm giving you the SVG files for FREE here. :)
Follow the prompts in Design Space to cut your iron-on foil.
Remember that when working with iron-on, you need to mirror the image before cutting, and place the iron-on foil shiny side down on the mat.
Use a weeding tool peel the excess foil away from your text.
If you don't have an EasyPress, you can use an iron for adhering your foil.
While the EasyPress is heating, determine where you would like the iron-on to be adhered onto your placemat.
You will need a hard, flat surface to use the EasyPress on. I used my kitchen counter, and laid a towel down to protect it.
Once the EasyPress is heated, warm the placemat by ironing for 3-5 seconds.
Place the transfer onto the placemat, top with the EasyPress, hit the Cricut button, and apply slight pressure to the machine. The countdown will begin, and the machine will beep when the timer runs out.
Flip the placemat over and repeat on the back side.
Allow the transfer to completely cool before peeling away the liner. If the transfer is not completely adhered, apply more heat, as necessary.
Repeat with additional placemats and napkins.
DIY Thanksgiving Place Setting Tips
Once your transfers are all in place, here are a few tips for creating a beautiful, easy DIY Thanksgiving Place Setting:
Layer dishes to add visual interest to your table. Don't be afraid to mix patterns and get creative!
Bring the outdoors in! Natural elements like pinecones and leaves are free and readily available this time of year. They look incredible when incorporated into a tablescape!
Repurpose what you already have. A rustic wooden bowl can easily be transformed into a vessel for flowers, and leftover pumpkins from Halloween can seamlessly transition into Thanksgiving decor!
If you like these ideas, please "Like," "Pin," "Share" or "Tweet!" Or, you can just shout it from the rooftops, if that's your thing. Thanks bunches!!! :)
This is a sponsored conversation written by me on behalf of Cricut. The opinions and text are all mine.


