DIY Wooden Farmhouse Sign with Cricut
/This is a sponsored conversation written by me on behalf of Cricut. The opinions and text are all mine. Affiliate links are included in this post, which means If you purchase something through the links, I may receive a small commission at no extra charge to you.

I guess I should start this DIY Wooden Farmhouse Sign post by telling you (if you didn’t already know) that our oldest son got married in October. ❤︎ If you follow me on social media, you’ll also know that a few months after he got engaged, our daughter got engaged. Her wedding is coming up in June. Between TWO kiddos getting married within the course of a year, a busy work schedule, and trying to have a life, needless to say it’s been a little hectic around these parts!
I’ve got quite a few amazing projects that we did for our son’s wedding that I haven’t even had time to share yet because, honestly, time is pretty scarce around here, y’all. They’re coming, though, and I think you’re gonna love them!
In the meantime, though, my friends at Cricut released the knife blade for the Cricut Maker and were looking for ambassadors to use it in a project. Well, perfect timing Cricut friends, because this Mama had an awesome project in mind for her little girl’s fast-approaching wedding and the knife blade is just what we needed!
See those raised letters on that sign above? The knife blade in the Cricut Maker cut them! It. cut. them. No other Cricut cutting machine has the power to cut through thicker materials like that, y’all. And how amazing does it look?!!! I’m still staring at it now in complete awe that I even made that sign. I’ve never made anything like this before and wasn’t sure how it was gonna go, but just look at it! Oh, and before you get all self-doubt-y on me, I’m just gonna tell you right now, if I can do it, you totally can! I’ll walk you through the whole process below. Ready? Let’s do this!
How to Make a DIY Wooden Farmhouse Sign
You’ll need:
This Project in Design Space
Three Pieces of Cricut Heavy Chipboard (it’s important to use the Cricut brand here, as it is specifically designed to work with the Knife Blade)
Masking Tape
Black Sharpies (I used three)
Black Acrylic Paint (I used DecoArt Lamp Black)
Small Craft Paint Brushes
Birch Hardwood Sheet, cut to 30” x 18.” The hardware store will cut it for you if you don’t have the tools to do it at home.
Pine Project Boards (1/2” x 2” x 4”), two cut to 36” and two cut to 19”
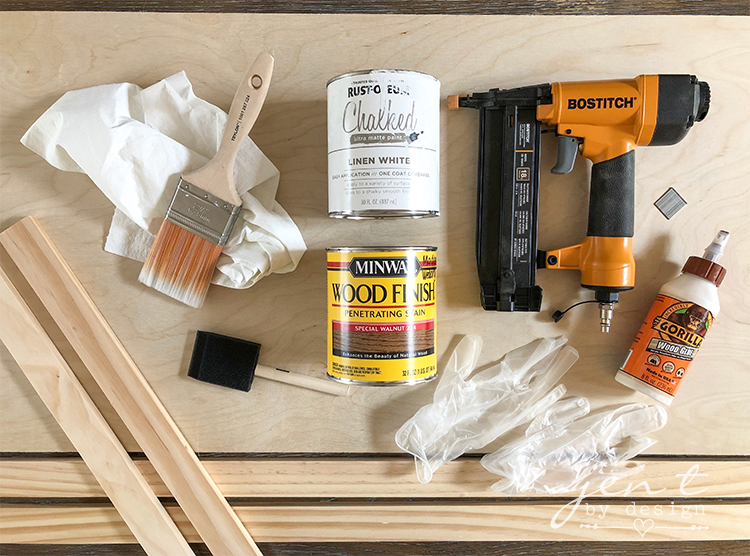
A Drop Cloth (or something to protect your work surface while you paint and stain)
White Chalk Paint (I used Rust-o-Leum in Linen White)
Paint Brush
Light Sand Paper
Stain (I used Minwax in Special Walnut)
Sponge Brush
Gloves
A Rag to wipe the stain
Wood Glue (I used Gorilla)
A Nail Gun and Brad Nails (I used Bostitch 18ga Brad Nails)

If you’re like me and aren’t too familiar with wood at the hardware store, these are pics of the wood I used. If you’re struggling to find the right wood, show these pictures to someone at the store and hopefully they can help you. :)

To begin, lay down a drop cloth or something you can use to protect your work surface. Use a rag to dust any debris or particles off of the birch hardwood sheet. The wood that we bought was nice and smooth, but if your board has any rough spots on it, hit it quickly with some sand paper then dust it off again. Paint the board with white paint, being sure that all of your strokes go in the same direction. Let dry completely, then add a second coat. Go over it very lightly with some sand paper to smooth out the finish, then dust off with a rag.

While the paint is drying, stain the pine trim boards. Use a sponge brush to apply the stain, again being sure that your strokes go in the same direction, then use a rag to wipe off the excess stain. You will need to stain the two widest sides of the boards as well as one of the thin sides. The thin side that you leave unstained will be the side that is hanging against the wall. Let dry completely.

Now, I’m not really sure how to describe this next step so bear with me here. If you look at the pic at the very top of the page you’ll notice that the trim sits above the surface of the board on the front side, giving the sign some dimension. There is a similar (actually larger) “ledge” of wood trim in the back, which is what will sit on the nails in your wall.
At this point, you need to determine how much “ledge” you want on your sign in the front and the back. Once you’ve determined that, use something to prop your board evenly up to that height, so that your project board meets your trim boards exactly where you’d like them to. We found three same-sized cookbooks and balanced the birch sheet on top of that.
Now place your trim boards along the birch sheet to make sure that they meet exactly where you’d like them to, adjusting what you’re propping it on until it’s just the right height. Once you’ve got everything lining up like you’d like it, apply wood glue to one side of the birch sheet, then use the nail gun with brad nails to secure it into place. Continue until all four trim boards are secured into place.

This is what the assembled sign should look like.


This is where the fun really starts! It’s time to put that Cricut Maker and Knife Blade to work! Before you do anything, I’d highly recommend watching this short video about how the knife blade works.
Before you use the knife blade for the very first time, it is super important to calibrate your machine. It’s essential that you follow this step! In Design Space, click on the three bars beside the home menu, then choose “calibration.”
While your machine is calibrating, take that time to secure your chipboard onto a Strong Grip Mat, then secure all of the edges with masking tape. This will ensure that no shifting occurs during the cutting process.
Next, move all of the white star wheels on the roller bar to the far right side of the machine. This will allow the thick chipboard the space that it needs to move under the roller bar. Now you’re ready to cut!

Open this project in Design Space and click “Make It.” Insert the mat and follow the prompts to begin cutting.
It’s important to note that while the Cricut Maker does have 10 times the cutting force of previous models, cutting takes some time. Once your machine has completed one pass on the project it will display in Design Space how many passes are needed to completely cut through the material. Be patient here, the results are worth waiting for!
Once the final pass is complete, WITHOUT UNLOADING THE MAT, check to see if the material has been cut all the way through. If it has, you can then unload the mat. If not, choose to add another pass in Design Space. Continue adding passes, if necessary, until the material has been cut all the way through.
This particular project on my machine required 20 passes per board.

Once all of your letters and text are cut, use a Black Sharpie to color the sides. Using a Sharpie here is soooo much easier than using paint because a) you don’t have to wait for it to dry and b) you don’t get wet, black paint all over your hands. :)
This is a pretty large sign and obviously one piece of 11” chipboard is too small to create the big text that was used here. This means you need to glue some pieces together to create a full word. Once all of the text sides have been colored in, add a small amount of wood glue to a toothpick. Apply to the edge of the “S” and the edge of the “r,” and secure to the “uga” text. Use something heavy (I used a hammer and the can of stain) to hold the pieces into place until they are completely dry,

While you’re waiting for the glue to dry, go ahead and start painting the smaller letters. Since you’ve already colored the sides, you only need to paint the tops. So quick and easy! Let dry completely.
Once they are dry, arrange all of the words on the sign where you would like them to be placed. Use a ruler or yard stick to ensure that you have the text centered.
Next, flip the letters over one at a time, apply glue, then turn over and position onto the sign. Apply slight pressure onto each small letter until it appears to be holding.
When it’s time to glue the large word, lay books on top of the letters to help hold them in place until they are completely dry.

So whaddya think? It’s so pretty, right? It definitely takes some time to complete, but it is soooo worth the end result!
This sign is going to hang over my daughter’s dessert bar at her wedding, and I can’t wait to see how it all comes together!!! If you want to see, too, make sure you’re following me on social media! You can find all of my handles at the bottom of the page.
Happy Celebrating, y’all!